Category Archives: Primitive skills / flintknapping / tools

How to Make a Rabbitstick (non-returning boomerang)

See my earlier posts How to Make a Returning Boomerang and Boomerangs are awesome! for more info about boomerangs.

The non-returning boomerang, aka rabbitstick was a ubiquitous and important weapon among hunter-gatherer cultures around the world, especially those living in open environments like desert, scrubland, and grassland.

The rabbitstick was used, obviously, to hunt rabbits, but also many other animals such as ground fowl, squirrels, and even large ungulates such as deer. The rabbitstick could instantly kill smaller animals when struck, but could also take down deer and antelope since it could break their legs, rendering them unable to flee.

The rabbitstick took many forms, but was always flattened and a foot to several feet long, and was usually bent along its length. Being thrown bend-first (with the V facing forward), the angle gave more force to the blow if it hit properly since the momentum would be directed along the length, striking with a smaller area of the weapon.

The rabbitstick was superior to a regular stick since the modification to be flat, bent, and with airfoils allowed it to travel much longer distances. A proper rabbitstick could be thrown with enough force to kill up to 200 yards, whereas a stick could only be thrown at most third of that distance. The flat shape, beyond enhancing flight distance, gave a more powerful blow since it concentrated the force to a small area.

The rabbitstick is fairly simple to make, and would be a great weapon to fashion in a survival situation. It is also pretty effective as a hunting weapon in general since it makes a two or three foot by 600 ft long killing zone. Compared to a bow and arrow or even a rifle, the rabbitstick may be better to hunt for medium-sized ground game in open areas, in such situations being only inferior to a shotgun.

Here are some basic instructions how to make one. More in-depth treatments of how to make rabbitsticks with different methods can be found in these blog posts: https://naturalskills.wordpress.com/2011/01/27/non-returning-boomerangs/ and https://naturalskills.wordpress.com/2011/06/17/boomerang-build-a-long/(also an awesome blog in general), and in the Bulletin of Primitive Technology #4 (1992) article by Errett Callahan “The non-returning boomerang.” Callahan (1999) has a similar article in a book (see reference).

1) find a piece of wood. It should have the bend of the angle you are looking for. If you try to artificially make a bend in an otherwise straight piece, you will have to cut across the grain, weakening the rabbitstick at the bend. It should be wide and thick enough to end up after trimming bark and shaping to be several inches wide by about an inch thick. The heavier the wood, the better. If you don’t have a saw or don’t want to use one, take into account the splitting ability of the wood. Many pines and cedars split cleanly. I chose incense cedar (Calocedrus decurrens) since it was easy to find a flattened, well-bent piece, and I knew it would split easily. This wood is not particularly heavy though, so I made the boomerang pretty wide to give it some heft. Another benefit to using this tree species is that it makes an excellent hearth-board for friction fire starting (the board you put a hole in that you spin a stick on), being used by many Californian Indians for this purpose.

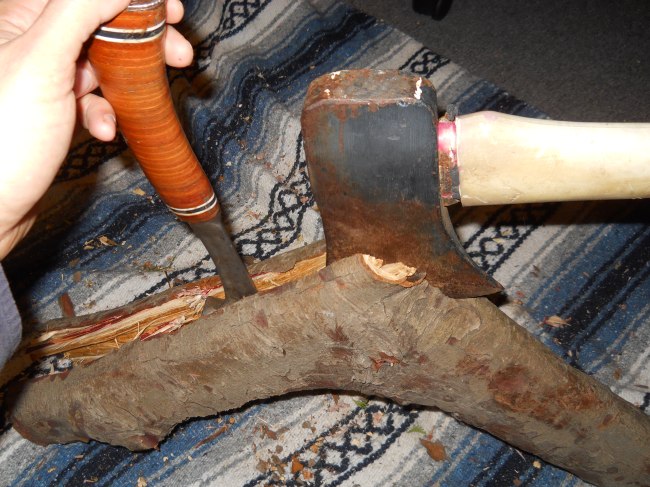
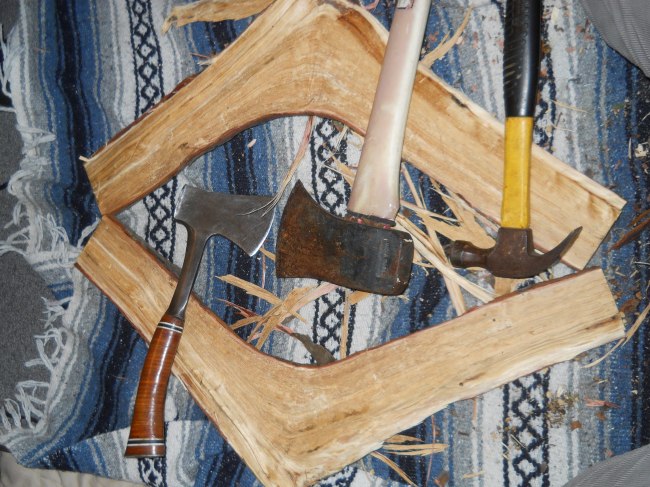
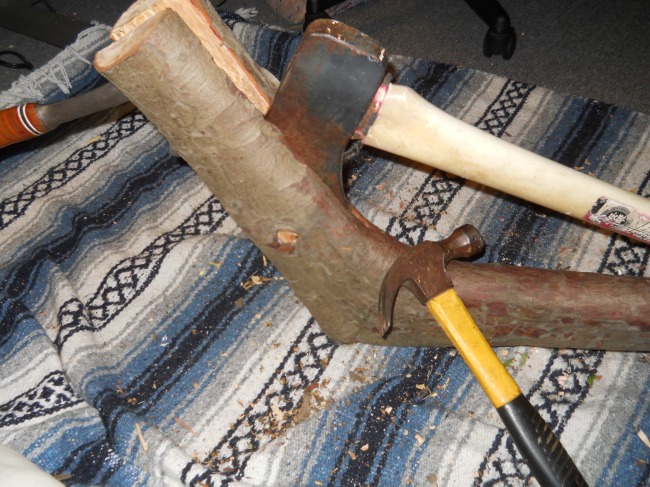
2) cut it to size then split it down the middle. You will need at least two wedges and a mallet, which can be fairly easily obtained in primitive situations. A very hard wood, bone, or best, antler, ground to shape makes a good wedge. A hard wood or rock makes a good mallet. I used a hatchet and splitting axe in place of wedges and a hammer for a mallet. I started the split on one end, got stuck in the middle so started again there, and to keep it splitting in the center, started a split once more at the other end. Pics below show this:

Image

Image

Image

Image

3) choose the better half and split that. Put your wedge in the center at one end (pictured below) and work it as far as you can. It may veer off and you’ll have to start at the other end and middle. If it won’t split at all just trim with your hatchet, knife, or saw. It should be only an inch or so thick uniformly along the length. I used the piece to the left in the below photo.

Image

4) trim the split piece to size, giving one end a good hand grip, and making the edges pointed. It should be somewhat elliptical in cross section like this shape: (), with the edges near the center of its thickness. The cross section of mine was more rhomboid or diamond-like, like this shape: <==>. Callahan (1999) discusses the effects different airfoils and edge shapes have on the flight of the non-returning boomerang. Most importantly, if the edges are too blunt or too near the top or bottom, it may not fly well. The finished rabbitstick should weigh about 12 ounces for optimum performance (Callahan 1999)

Here is my finished (I left it pretty rough) rabbitstick. It’s about 1/2 to 3/4 inch thick throughout the length, and 1.5 to 2.5 in wide on the ends, with the max width of 5 in in the middle. The end I’m holding is more elliptical in cross section to make a good grip, while the other end is more flat on the top and bottom, with edges angled like an axe blade.

Image

Tips:

Many different shapes and sizes will work.

The most important factors are keeping it flat, straight, and with edges along the centerline. A good bend helps, but it may also be more of a gradual curve like this shape: (.

You can work the wood green (which is better for splitting or using stone tools), but keep in mind it may warp when dry. You can take steps to secure it in shape as it dries, or bend it back to shape after it warps by applying oil or grease and heating it steaming hot over a fire, bending it to shape, and allowing it to cool while holding it in shape.

Disclaimer: I take no responsibility for any injury or death resulting from any information in this blog.

REFERENCE

Callahan, Errett. 1999. How to make a throwing stick: the non-returning boomerang. In D. Wescott (ed.) Primitive Technology: a book of earth skills. Gibbs Smith, Publisher, Layton UT.

How to Make a Returning Boomerang

A returning boomerang is not just a cool toy: this is a weapon useful for killing birds in flocks, and as a hawk decoy to flush waterbirds into nets.

What do you call a non-returning boomerang? A stick!… Not! Actually, although what most think of as a “boomerang” is the returning kind, most boomerangs used traditionally by Australian Aborigines were non-returning, but still specially designed to be thrown long distances in a straight line to deliver a lethal blow, as well as used for many other purposes.

See my post Boomerangs are Awesome! for background info and more about technical principles about boomerangs.

Steps to make a returning boomerang:

1) obtain a section of wood with a bend measuring 90-120 degrees. It must be from a fork, or bent root so the grain follows the bend. If you cut the proper angle into a straight piece, the boomerang will be weak and liable to break at the bend. It should be fairly straight and flat besides the bend. I chose blue gum eucalyptus wood, which is not particularly good for carving, but is very abundant around here and had that Australian authenticity to it.

2) cut it to equal lengths from the bend and cut that in half. I used a saw but for straight-grained, easily split wood, you can split it with a hatchet or axe and wedge.

DSCN0746

3) thin it down and carve airfoils on both ends, facing opposite directions and blending at the center bend.

boomerang constructionDSCN0748DSCN0750DSCN0752

4) once you’ve finished the airfoils, round the ends. The below photo shows all the tools I used so far with the unfinished boomerang in the middle and the unworked half on the right.

DSCN0753

5) carve flutings along the length of the top of the airfoils using a small gauge.

DSCN0756DSCN0759

6) slightly round the bottom of the front of the airfoils, cutting off this bottom front corner with a single knife sweep.

DSCN0758

7) to bend the boomerang at the middle, to give it a positive dihedral shape (meaning if you put the flat bottom of one end of the boomerang on a flat surface the other end will stick up), cover it in oil or grease (I used olive oil) and slowly heat it up til it’s too hot for bare hands over a fire or stove (try not to scorch it), then bend it to the desired shape while it’s hot and hold it like that til it’s cooled. This took quite a bit of strength and using a bench to leverage against. Be careful not to crack the wood. The photo below shows the positive dihedral I put on it.

DSCN1132

8) throw it to test it out. Obviously you need a big field with no danger of hitting others. You should throw it with the V facing forward and the ends straight up and down. There should be a constant breeze to your front that you throw at an angle of 45-90 degrees from. Depending on the flight pattern, you may need to reduce weight, change the dihedral, or make other adjustments to get a full return. See these websites’ tips on throwing and tuning:

http://www.angelfire.com/nc/conally/manual.html

http://www.boomerangs.com/tuning.html

http://www.boomerangs.com/howtothrow.html

9) WARNING/DISCLAIMER: a wooden boomerang is a dangerous weapon. Make sure to always throw it in a manner to avoid hurting yourself and others. I take no responsibility for your safety in making or using a boomerang.


Boomerangs are awesome!

I was at the library checking out a book on sling and slingstone archeology, and next to it was a book on boomerangs! So of course I got it. My dad had a nice wood boomerang when I was a kid, and I played with that and some plastic ones at one point too. They are much harder to get to return than you might think. I never got the wood one to work, and I was always scared it would hit me on returning.

We tend to think of the boomerang as a toy, or novelty, but it was a nearly-ubiquitous and very important weapon, tool, and religious object for aboriginal Australians (Jones 1996). Every hunter had at least a few, often many of various designs for many functions (Jones 1996). They called them “karli,” “belo,” “iringili,” munartajartu,” “pirrkala,” “wallanu,” “warlanu,” “warraka,” “wana,” “murrawirrie,” “ngamiringa,” “yarrakoodakoodari,” “karra,” and many more names, but most commonly, “kiley,” with different types having different names, and for different language groups (Jones 1996). Aborigines in Tasmania did not have boomerangs, nor did most in the tropical north or those in the western central desert regions (Jones 1996).

There are two main categories of boomerangs: returning and non-returning (Jones 1996). The latter are kind of like the rabbitstick that was a common weapon of American Indians to throw at rabbits and small game. This type of weapon is a major improvement over just a plain stick since they are carved thin and have a bend in one end or near the middle. This shape makes them go much further, straighter, and have more force upon impact. These sticks were found in many aboriginal societies, as well as ancient Egypt (Jones 1996).

Image

rabbitsticks or throwing sticks, including some returning boomerangs, from Tutankhamen’s tomb (Jones 1996)

The non-returning boomerang was perhaps more common than the returning form, the latter which may have been mainly used for small game hunting, hitting flocks of birds or to mimic a hawk in order to make waterfowl fly low into a net (Jones 1996, see more on this down below).

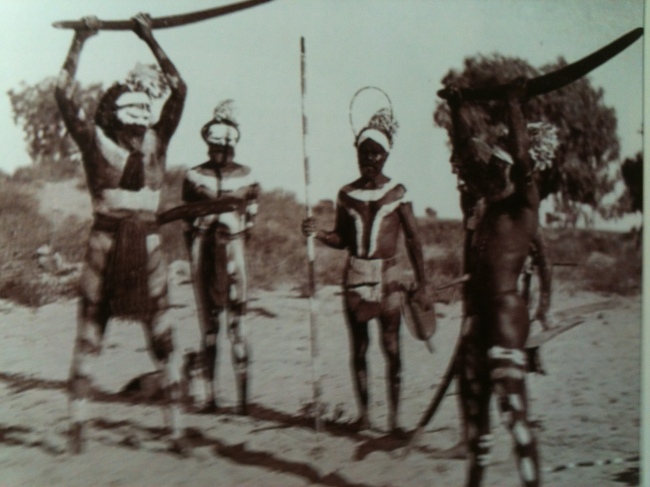
The non-returning and returning boomerangs were used for many purposes other than throwing for hunting: they were used for hand to hand combat (esp. the longer, straighter ones), a knife, a hammer or club, a digging tool, making fire by friction (fire plow technique), for clapping together as a percussion instrument, and for many ceremonial or religious purposes (Jones 1996). The diversity of shapes reflects their diversity of uses, and for hunting, there was many different shapes depending upon the prey and the desired flight path.

Image

hand to hand combat with boomerangs (Jones 1996)

The returning boomerang was sometimes thrown over a flock of waterfowl, the boomerang having a hole drilled in one end to make a whistling sound like a hawk, while hunters also made a hawk cry, in order to flush the birds towards a low net that had been previously strung across the body of water, since the boomerang-hawk made them fly low, and rapidly in fright. Upon hitting the net, hunters at each end would let it drop, trapping the birds.

Image

flushing waterfowl into net with hawk-mimicking returning boomerangs (Jones 1996)

The returning boomerang was also thrown into flocks of birds, being superbly effective with its high velocity and eccentric flight path making it very difficult to dodge by the birds, though the boomerangs flight path would be well-known to the hunter (Jones 1996). Of course, whenever the returning boomerang hit its mark, it fell and did not return.

The returning boomerang was used also for games and sport by the Australian aborigines, some similar to today’s contests with boomerangs, where one person throws and tries to get it to perform particular flight patterns like figure eights, or return accurately to a circle drawn around the thrower, or hit a peg (Jones 1996). A game was played mimicking war, where a line of warriors threw one by one at eachother, holding shields, and trying to dodge or block incoming boomerangs, which was difficult given their erratic flight path (Jones 1996).

Depending upon how it was thrown, a boomerang can have drastically different flight paths:

Image

flight path of an illuminated boomerang at night (Jones 1996)

Image

variability of flight path based on throwing technique (Jones 1996)

One special type of (non-returning) boomerang was biconvex, short, and wide, with a pointed handle and sharp edges (Jones 1996). This type was thrown into water to kill fish near the surface. This type was also made with metal when it became available (Jones 1996).

Image

fishing boomerang (Jones 1996)

Image

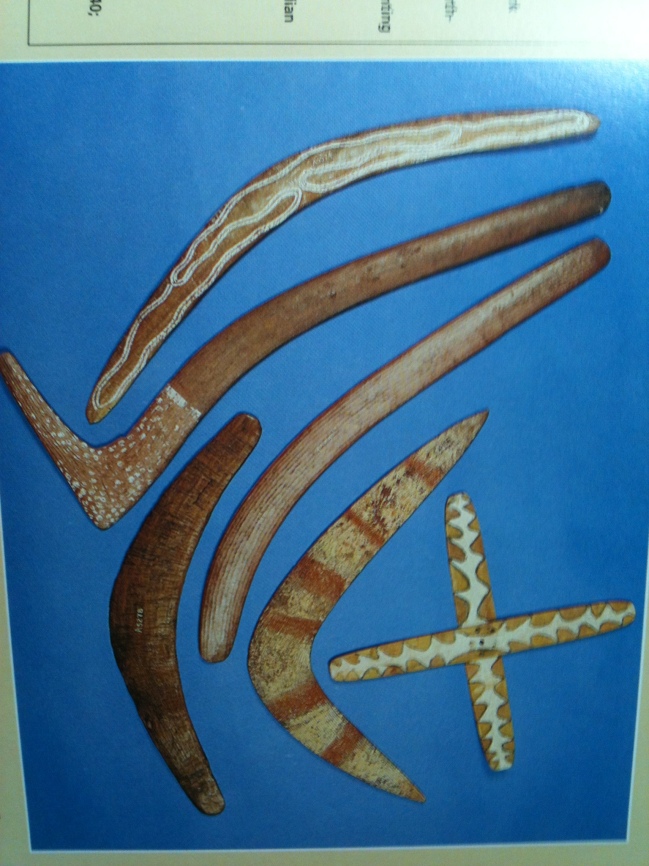
diversity of boomerangs of Aboriginal Australians (Jones 1996)

Some boomerangs were cross-shaped, others had hooks on one end, but mainly they varied by length, angle, sharpness of ends, and thickness, wood, and weight.

Often boomerangs were incised and / or painted with maker’s marks or ancestral designs. One common incising was fine flutings down the length of boomerangs (Jones 1996). I suspect this may have had an affect on performance, since overly-smooth boomerangs don’t fly as well. The dimples on golf balls really enhance their flight, and this may be analogous with these flutings (Jones 1996).

Once boomerangs became a popular tourist item, aboriginal manufacturers starting focusing more on carving and painting designs than quality of functional design (Jones 1996).

Modern boomerangs are often manufactured, and are made of plywood, plastic, or cardboard to be a safe toy (Jones 1996). Some are in made in novelty shapes (Jones 1996). Competition boomerangs include tri-bladed designs for “fast catch” events, while unequal-limbed designs (also often found in aboriginal boomerangs) are used for “maximum time aloft” competitions (Jones 1996).

The returning boomerang uses two opposite-facing airfoils blended at the center, a slight positive dihedral, and a bend in the middle around 107 degrees (lefties need to reverse the side of the airfoils). The fly using the principles of gyroscopic stability, gyroscopic precession, Bernoulli’s principle of differential air pressure and the Coanda effect along with Newton’s laws of motion.

Image

technical boomerang design

http://www.researchsupporttechnologies.com/boomerang_site/boomerang6.htm

Normally, a boomerang is thrown overhead, “V” pointing forward, held nearly vertically, gripped in the hand or between the thumb and forefinger. The flat side faces away. Throw at about a 45 degree angle from the incoming wind. A boomerang can be tuned by test flights, then altering the wing shapes to correct the flight errors. See the link below for more info on tuning.

http://www.angelfire.com/nc/conally/manual.html

I collected some nice bent branches of madrone the other day, and I’m going to carve some traditional returning boomerangs! I’ll post a photo-methods record when I do.

Here is a great photo documentation blog post about making a non-returning boomerang (it’s an awesome blog in general too): http://naturalskills.wordpress.com/2011/06/17/boomerang-build-a-long/

REFERENCE:

Jones, Philip. 1996. Boomerang: behind an Australian icon. Ten Speed Press, Berkeley, CA.

Development of a flintknapper


These points are shown in the order I made them. These are all the points I have successfully completed. I began flintknapping late this summer, and had spurts of progress working with the California knappers, and lately by myself.

All are “woodland type” arrowhead points, with exception of the one mahogany small spearhead point.

I used all “primitive” tools, or tools used by stone-age American Indians, not out of pretension but since such tools were made from free materials I already had – meaning I didn’t have to go buy anything like copper billets. The tools I used were mule deer and whitetail deer antlers (for pressure flaking with the tines and using the rosettes for percussion flaking billets), a basalt cobble for a hard hammerstone, sandstone cobbles for soft hammerstones and abrading, and pumice stone for abrading and sharpening my pressure flakers. I made an Ishi-stick pressure flaker from an antler tine, elderberry wood, and artificial sinew (ok not primitive but close enough). Plus I used lots of leather pads, and my safety goggles (also not primitive, but I’m not a fan of obsidian flakes in the eye; Ishi, and presumably other American Indians when struck in the eye with a flake, would quickly pull down their lower eyelid, look down, and vigorously slap the back of their head. American Indians also always knapped in a designated place, and did not talk while knapping, presumably also for safety reasons).

I made the two smaller dacite points into necklaces by wrapping the notched area in copper wire and forming a loop that I strung with a tanned deerskin leather cord.

I gave the 2nd and last four (all the best) as Christmas gifts to all my family members.

Second, third, and fourth knapped points

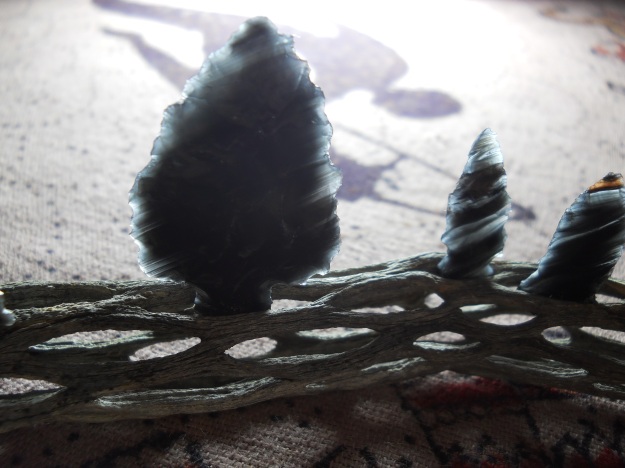
The one on the left was my second point. I got a few tips from expert knapper Ken Peek working on it with the California Knappers (http://www.primitiveways.com/California_Knappers.html). The two on the right I did alone. These are made from cobbles I collected from a stream near the Middle Fork Davis Creek obsidian mine in Modoc National Forest, CA.
I’ve mounted them on the skeleton of an Opuntia cactus I got off some ancient lava beds in New Mexico.

Third knapped point

This is the third arrowhead point I’ve flint-knapped, and the first I did without any help or pointers from expert knappers. Made from obsidian I collected from a stream near the Middle Fork Davis Creek obsidian mine in Modoc National Forest, CA. Note the red pigment at the very tip; this is part of the stone, not blood.

Santa Barbara Sedge Baskets

Santa_Barbara_sedge

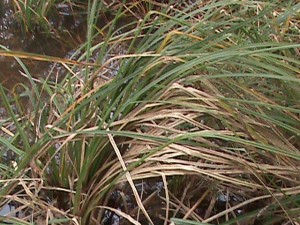
Carex barbarae

Santa Barbara Sedge – Carex barbarae

The Pomo Indians of California called this sedge Kä-höm’ which translates “water-gift.”

This species was very often used in basket making, being the white or creamy groundwork of most Pomo baskets (Chesnut 1902).

 Many hundreds of species of Carex are found across the US, and many were used for basketry by the American Indians.

Roots were collected during the summer and early fall (Chesnut 1902). A root end by the plant is grasped between the first and second toes, while a clam shell is used in one hand to scrape away dirt and a stick is used in the other hand to pry away stones and other roots and loosen the ground (Chesnut 1902). Women would gather about 15-20 root strands each day but men only about 10 on account of his long siesta (Chesnut 1902).

To maintain the root’s flexibility and soften its bark, roots are immediately placed in water to soak overnight (Chesnut 1902). The next morning, the end of the roots are chewed to separate the bark, which is then scraped away while one end of the root is held in the teeth and the other between the toes (Chesnut 1902). This white or tan inner root is coiled for carrying (Chesnut 1902). When ready for use, the roots are thoroughly soaked in warm water, then the ends split with fingernails into three parts, which were grasped by the teeth, and two hands to carefully and very evenly split the root into three sections (Chesnut 1902). Each of these sections is then split again in the same way, and the resulting sections split again the same until the desired fineness of strand is reached (Chesnut 1902). The value, beauty, and quality of the basket increased with fineness of strands used (Chesnut 1902). Finer strands were used like thread to wrap around horizontal withes (Chesnut 1902).

Since each basket was created from the mind with no model or skeleton, exacting care was necessary to make symmetrical designs (Chesnut 1902). It required many months to years of leisure work for a high quality basket (Chesnut 1902). A single regular-sized basket could take 600-800 hours of work to finish!

Such baskets were made to be watertight. They were used as cooking vessels, with rocks heated in a fire stirred with water and food in the basket to boiling temperatures. On account of their beauty and durability, they were passed down as heirlooms despite heavy, intense usage (Chesnut 1902).

Chesnut, V. K. 1902. Plants used by the Indians of Mendocino County, California. Government Printing Office, Washington, DC.

basket made by Pomo

Sedge basket made by Pomo Indians (Wikipedia)

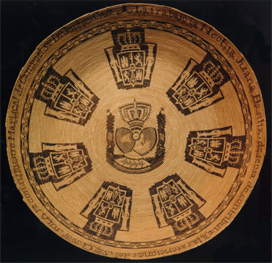
Juana Basilia, Chumash presentation basket with Spanish colonial coin designs, 1815–22. Deer grass, Indian rush, sumac, 24 ½ in. diameter, 4 in. height. Courtesy of the Santa Barbara Museum of Natural History.

Juana Basilia, Chumash presentation basket with Spanish colonial coin designs, 1815–22. Deer grass, Indian rush, sumac, 24 ½ in. diameter, 4 in. height. Courtesy of the Santa Barbara Museum of Natural History.

See the below blog posts about modern-day basketry by California Indians, where I got these photos of amazingly beautiful (& functional!) baskets made by Abe Sanchez.

Gathering sumac / Gathering deergrass

Yokuts-style basket / Abe Sanchez

Gathering Rhus trilobata, aka basket sumac

My first knapped point – small arrowhead percussion and pressure flaked from obsidian collected from the side of bottle rock road near Mt. Konocti, CA.

My first knapped point – small arrowhead percussion and pressure flaked from obsidian collected from the side of bottle rock road near Mt. Konocti, CA.

My first knapped point – small arrowhead made from (bubbly=knappably-inferior) obsidian collected from the side of bottle rock road near Mt. Konocti, CA (photos of site in below posts). Made with the help of Dino Labiste with the California Knappers (http://www.primitiveways.com/California_Knappers.html). Arrowhead is atop a weathered obsidian specimen from the same area.